Replacing or fitting a PC (printed circuit) board in a Scotsman NW608 ice machine requires careful attention to ensure proper installation and avoid damage to the machine or the new board. Below is a step-by-step guide based on general procedures for replacing a PC board in Scotsman modular ice machines, as specific instructions for the NW608 may vary slightly depending on the exact model configuration (e.g., air-cooled or water-cooled). Always consult the service manual for your specific machine and follow safety protocols. If you’re unsure, consider hiring a qualified
Tools and Materials Needed
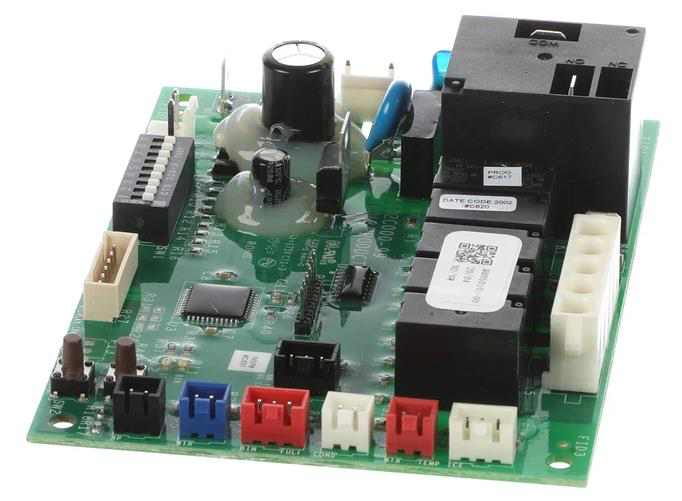
- Replacement Scotsman PC board (ensure compatibility with NW608; e.g., part number from a supplier like icemachines.co.za
- Screwdriver (Phillips or flathead, depending on screws)
- Anti-static wrist strap (to prevent damage to the PC board)
- Multimeter (optional, for testing electrical connections)
- Scotsman NW608 service manual
- Clean, non-conductive workspace
Safety Precautions
- Power Off: Disconnect the ice machine from the power supply to avoid electrical shock. Verify the power switch is off and the cord is unplugged.manualslib.commanualslib.com
- Ground Yourself: Use an anti-static wrist strap to prevent electrostatic discharge, which can damage the new PC board.
- Check Compatibility: Confirm the replacement PC board is the correct part for the NW608 by checking the part number against the Scotsman parts catalog or supplier information (e.g., Parts Town or Cold Supply).partstown.comcoldsupply.com
- Review Manual: Refer to the Scotsman NW608 service manual for model-specific wiring diagrams
Step-by-Step Instructions
- Locate the PC Board:
- The PC board in the Scotsman NW608 is typically housed in the front console panel, behind the control panel or a protective cover.manualslib.com
- Remove the front panel of the ice machine by unscrewing the fasteners (usually 2–4 screws). Check the service manual for exact panel removal instructions.manualslib.comtechtownforum.com
- Identify the PC board, which is a flat circuit board with multiple wire connections and indicator LEDs (e.g., for power, bin full, alarms).manualslib.com
- Document Connections:
- Before disconnecting anything, take photos or make a diagram of the wiring connections to the PC board. Label wires if needed to ensure correct reconnection.
- The NW608 PC board typically connects to components like the compressor contactor, water inlet valve, water pump, purge valve, harvest valve, fan motor (for air-cooled models), and ice thickness sensor.manualslib.com
- Disconnect the Old PC Board:
- Carefully disconnect all wiring harnesses and connectors from the PC board. Note that some connectors may have locking tabs that need to be pressed to release.
- Remove any screws or clips securing the PC board to the control panel or mounting bracket. Gently lift the board out, avoiding damage to surrounding components.
- Install the New PC Board:
- Place the new PC board in the same position as the old one. Secure it with the original screws or clips.
- Reconnect all wiring harnesses and connectors exactly as they were on the old board, using your photos or diagram as a guide. Ensure each connector is firmly seated and no pins are bent.manualslib.com
- Double-check connections for components like the water pump, inlet valve, and ice thickness sensor, as incorrect wiring can cause malfunctions.partstown.com
- Inspect and Test Connections:
- Verify that all connections are secure and that no wires are pinched or loose.
- If you have a multimeter, test the electrical connections to ensure proper voltage (check the nameplate rating on the machine’s data plate, typically located on the control panel or rear left side).
- Reassemble the Machine:
- Replace the front panel and secure it with the original screws.
- Ensure the machine is properly grounded, as Scotsman cubers require a neutral wire and solid earth ground to prevent electrical shock or equipment damage.
- Power On and Test:
- Plug in the machine and turn on the power switch. The PC board should energize, and LEDs on the front console (e.g., power, operation) should light up.
- Initiate a start-up cycle by opening the water tap/valve and ensuring the water reservoir fills properly (takes about 30 seconds for the water pump to start).
- Monitor the machine for one or two ice-making cycles (typically 15–20 minutes per cycle) to confirm the PC board is functioning correctly. Check for proper ice production, water flow, and no error codes (e.g., “Bin Full” light when the bin isn’t full).
- Adjust Ice Thickness (if needed):
- If the new PC board affects ice cube size, adjust the ice thickness sensor per the service manual. Locate the sensor near the evaporator plate, adjust the screw to set the distance between the sensor reeds and the evaporator, and verify cube size after a few cycles.
- For the NW608, typical cube sizes are:
- Dice: 22 x 22 x 22 mm (10 g)
- Half-dice: 10 x 22 x 28 mm (6 g)
- Large: 28 x 22 x 28 mm (15 g)
- Check for Errors:
- If the machine doesn’t produce ice or shows error indicators (e.g., high pressure, bin full, or alarm LEDs), troubleshoot using the Scotsman troubleshooting guide. Common issues include:
- Misconnected wires (recheck connections).
- Faulty sensors (clean or replace ice thickness or water level sensors).partstown.com
- Low refrigerant or water leaks (requires a technician).partstown.com
- Reset the machine if needed by following the reset procedure in the manual (e.g., press the reset button on the front console).
- If the machine doesn’t produce ice or shows error indicators (e.g., high pressure, bin full, or alarm LEDs), troubleshoot using the Scotsman troubleshooting guide. Common issues include:
- Final Checks:
- Ensure no water leaks occur during operation.manualslib.com
- Verify the machine is producing the expected ice output (up to 320 kg/24 hours for the NW608, depending on conditions).
- Clean the machine if necessary, following maintenance guidelines (e.g., use Scotsman Ice Machine Cleaner)
Additional Notes
- Storage Bin: The NW608 is a modular ice machine, meaning it requires a separate storage bin (e.g., NB393, NB530, NB948, or FOL600). Ensure the bin is properly installed with the correct bin top adapter (e.g., CBT48EAMCD for NB948).hubbardsystems.co.ukpetraequipment.com.au
- Environmental Requirements: Maintain ambient air temperature between 10°C and 43°C, water temperature between 5°C and 38°C, and water pressure between 1 bar (14 psi) and 5 bar (70 psi).caterware.co.za
- Warranty and Service: If the machine is under warranty, use only OEM parts and consider contacting an authorized Scotsman service provider (e.g., Moffat or a local distributor) to avoid voiding the warranty.
- Resources: Download the Scotsman NW608 service manual or technical service training guide from ManualsLib or Scotsman’s official website for detailed wiring diagrams and troubleshooting steps.
Warnings
- Electrical Safety: Always ensure the machine is unpowered and grounded properly to avoid severe electrical shock or equipment damage.
- Professional Assistance: If you’re not experienced with electrical components or ice machine repair, hire a certified technician, as improper installation can lead to machine failure or safety hazards.
- Refrigerant Handling: If the installation process reveals issues like low refrigerant (R290 for the NW608), only a licensed technician should handle refrigerant-related repairs.
If you encounter issues or need specific part numbers, contact Scotsman’s authorized parts distributors like icemachines.co.za or check the data plate on the machine (located on the control panel or rear left side) for model-specific details. For further assistance, reach out to icemachines.co.za